
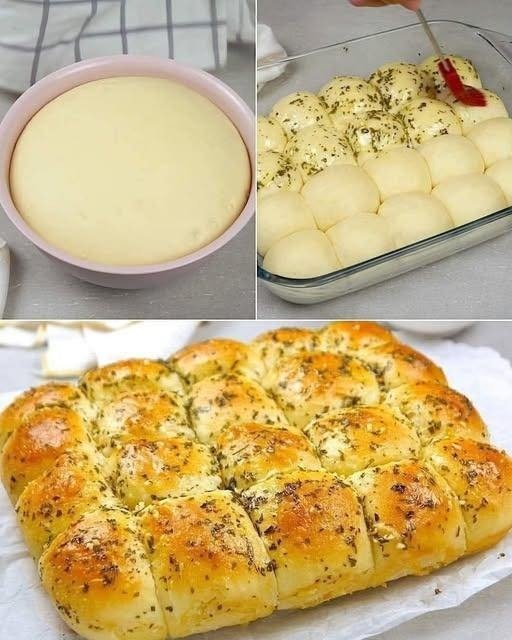
Homemade Garlic Buns
Homemade garlic buns are one of those breads that instantly make a meal feel complete. Soft, fluffy on the inside, lightly crisp on the outside, and brushed with rich garlic butter, they are hard to resist straight from the oven. These buns work beautifully alongside pasta, soups, salads, or as a snack on their own. Making them at home might sound time-consuming, but the process is simple and rewarding. The aroma alone is worth it, and once you try them fresh, store-bought versions rarely compare.
Prep time: 20 minutes
Rising time: 1 hour 30 minutes
Cook time: 18 to 20 minutes
Total time: About 2 hours 10 minutes
Yield: 12 buns
Ingredients
For the Dough
All-purpose flour: 3 ½ cups (440 g)
Warm milk (not hot): 1 cup (240 ml)
Instant yeast: 2 ¼ teaspoons (7 g / 1 sachet)
Sugar: 2 tablespoons
Salt: 1 teaspoon
Unsalted butter, softened: 4 tablespoons (56 g)
Egg: 1 large
For the Garlic Butter Topping
Unsalted butter, melted: 4 tablespoons (56 g)
Garlic cloves, finely minced: 4 to 5 cloves
Fresh parsley, finely chopped: 2 tablespoons
Salt: ¼ teaspoon
Instructions
In a large bowl, combine warm milk, sugar, and yeast. Let sit for 5 minutes until slightly foamy.
Add the egg, softened butter, and salt to the yeast mixture and mix well.
Gradually add flour, mixing until a soft dough forms.
Knead the dough for 8 to 10 minutes until smooth and elastic.
Place the dough in a lightly oiled bowl, cover, and let rise until doubled in size.
Punch down the dough and divide it into 12 equal portions.
Shape each portion into a smooth bun and arrange on a lined baking tray.
Cover loosely and let rise again for 30 minutes.
Preheat the oven to 375°F (190°C). Brush buns lightly with plain butter.
Bake for 18 to 20 minutes until golden, then brush generously with garlic butter and sprinkle with parsley before serving.
Tips
Use warm milk, not hot, to avoid killing the yeast.
Kneading well ensures soft, airy buns.
If dough feels sticky, add flour one tablespoon at a time.
Let the dough rise in a warm, draft-free spot.
Even-sized buns bake more evenly.
Brushing butter before baking adds color.
Apply garlic butter while buns are hot for maximum flavor.
Fresh garlic gives stronger flavor than garlic powder.
Cover buns lightly during the second rise to prevent drying.
Serve warm for the best texture.
Variations
Add shredded mozzarella or cheddar inside each bun.
Sprinkle sesame or nigella seeds on top before baking.
Use whole wheat flour for half the flour amount.
Add a pinch of chili flakes to the garlic butter.
Stuff buns with herb butter for extra richness.
Shape into pull-apart rolls for sharing.
Add Italian seasoning to the dough.
Use olive oil instead of butter for a lighter bun.
Make mini buns for party platters.
Brush with honey butter for a sweet-savory twist.
Q&A
Can I make the dough ahead of time?
Yes, refrigerate after the first rise and bake the next day.
Why are my buns dense?
Under-kneading or insufficient rising time can cause this.
Can I freeze garlic buns?
Yes, freeze baked buns and reheat before serving.
Do I need a stand mixer?
No, hand-kneading works perfectly.
Can I use dry active yeast?
Yes, just activate it in warm milk first.
How do I keep buns soft?
Store in an airtight container once cooled.
Can I use garlic powder instead of fresh garlic?
Yes, but fresh garlic gives better flavor.
What pairs well with garlic buns?
Soups, pasta, grilled meats, and salads.
How long do they stay fresh?
Up to two days at room temperature.
Can I double the recipe?
Yes, it scales well for larger batches.
Nutrition
(Approximate per bun)
Calories: 210
Protein: 6g
Carbohydrates: 28g
Fat: 8g
Fiber: 1g
Conclusion
Homemade garlic buns are simple, comforting, and incredibly satisfying. With basic pantry ingredients and a bit of patience, you can create bakery-style buns that elevate any meal. Whether served fresh from the oven or reheated the next day, they deliver soft texture and bold garlic flavor every time. Once you make them at home, they are sure to become a regular favorite at your table.